Aircon Installation Process and What's Included
What's involved in a professional aircon install in Penang: site survey, mounting, piping, electrical, pressure test, commissioning.
Getting your cooling system sorted is about more than just mounting a box on the wall. A flawless aircon installation process prevents early refrigerant leaks, compressor failures, and expensive water damage. The new 2026 TNB time-of-use tariffs push peak rates up to 63 sen per kWh.
A sloppy setup that forces your compressor to overwork will quickly bleed your wallet dry.
As the team at PG1 Aircond with over 15 years of experience keeping Penang cool, we have seen every shortcut in the book. Fixing botched jobs makes up a huge part of our weekly emergency repairs. We want to show you the exact aircon install steps that guarantee a professional, no-corners-cut job.
These are the proven methods that ensure your unit runs efficiently and lasts for years.
Step 1: Site survey (30-60 minutes)
A direct assessment of your space guarantees you get the right cooling capacity. Our technicians visit your property to evaluate the room before providing a quote. Calculating the exact BTU requirement prevents you from installing a unit that is too small to cool or too large to dehumidify — our guide on what size aircon you need walks through the maths. A standard room in Malaysia needs about 60 to 80 BTU per square foot depending on sun exposure.
We check several critical factors during this visit.
- Room dimensions: Accurate measurements dictate the exact unit size needed.
- Indoor unit mounting location: The ideal spot is high on a wall away from direct sunlight and obstructions.
- Outdoor unit placement: The compressor must be accessible, shaded, and placed on an approved condo aircon ledge if applicable.
- Piping route: Finding the shortest sensible path between units improves efficiency.
- Electrical capacity: A dedicated breaker might be needed if the existing circuit cannot handle the load.
- Drainage path: Condensate needs a clear, gravity-fed route to a nearby floor trap.
Our team sends you a written quote detailing every specific requirement after the survey.
Step 2: Preparation (30 minutes on install day)
Protecting your home is the very first thing that happens on installation day. We bring all necessary materials to safeguard your property before touching any tools. Heavy-duty corrugated plastic sheets are laid down instead of flimsy cloth drops. This thick barrier prevents heavy compressors or dropped tools from chipping your floor tiles.
Our crew handles the following preparation tasks quickly.
- Moving or covering nearby furniture.
- Laying down floor protection along the walking path.
- Staging all parts and specialized tools.
- Preparing the outdoor unit base or wall bracket.
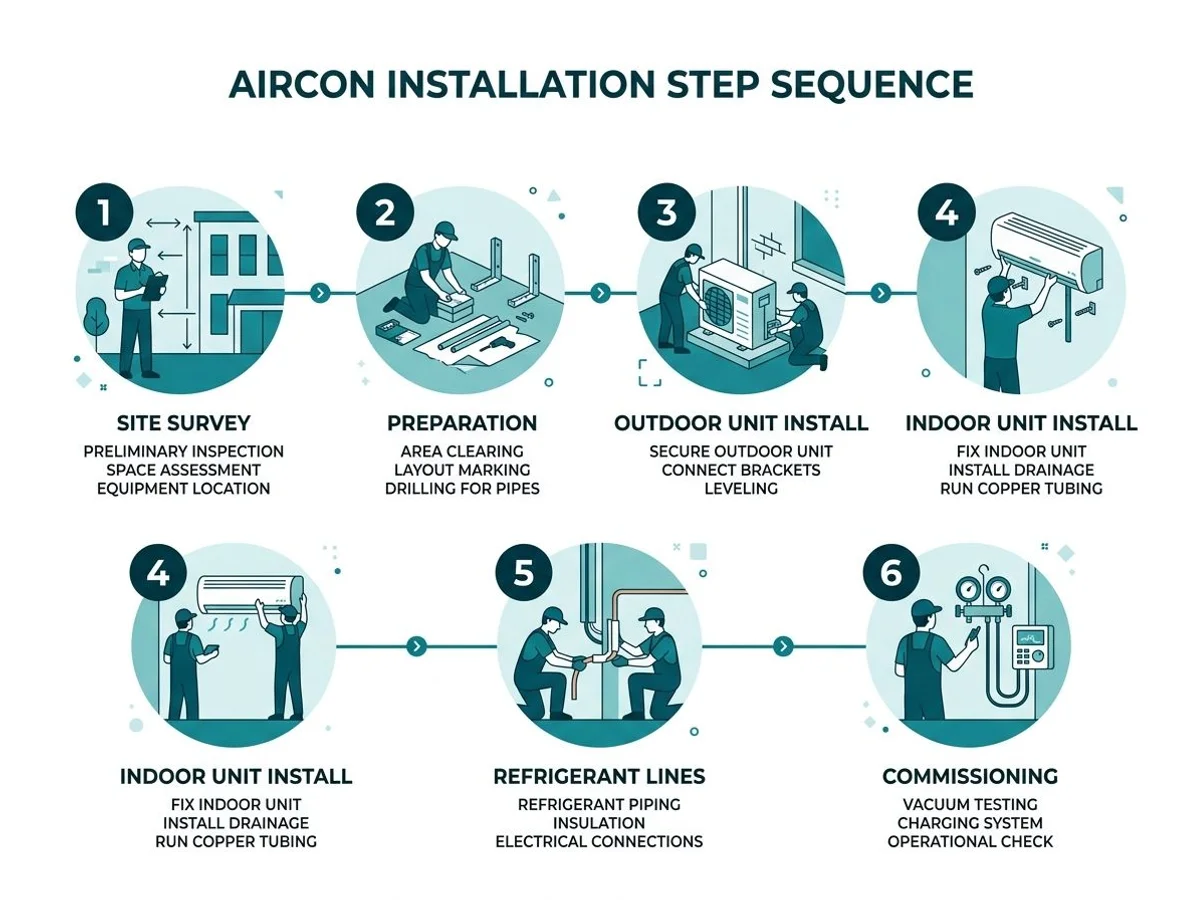
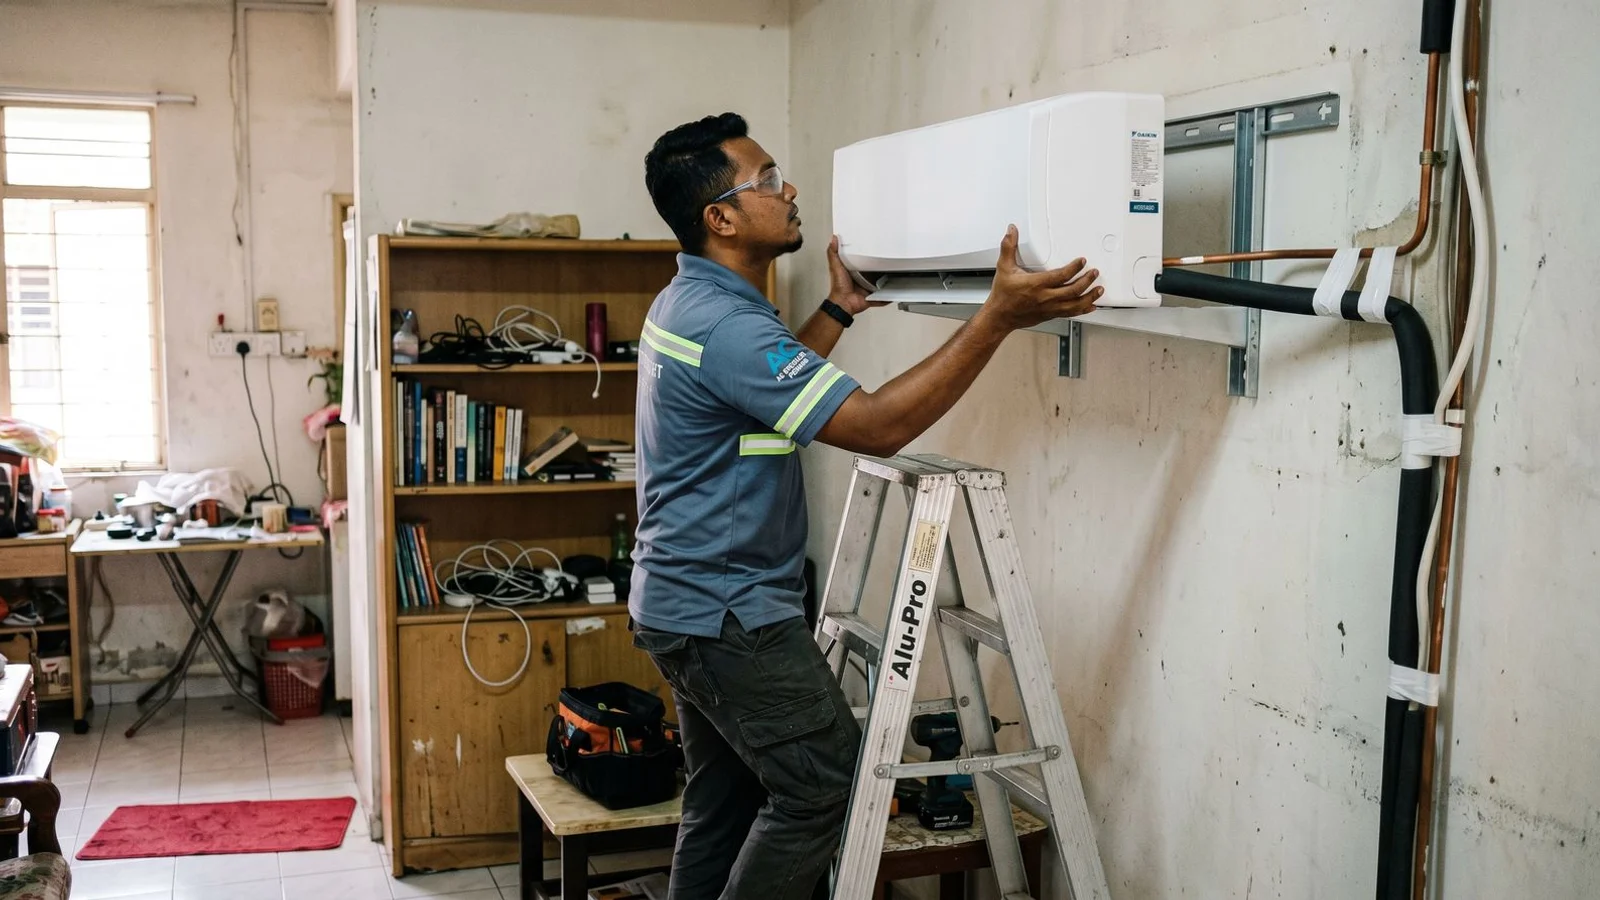
Step 3: Indoor unit mounting (45 minutes)
Proper mounting ensures quiet operation and prevents unexpected water leaks down your wall. We secure the indoor bracket using heavy-duty anchors designed specifically for concrete and masonry walls. Leaving a minimum clearance of 15cm from the ceiling is a strict rule. This gap allows the unit to pull in enough warm air to cool the room effectively.
Our installers take specific steps to hang the indoor unit perfectly.
- Fixing the bracket firmly to the wall.
- Leveling the bracket with a slight tilt toward the drain side for proper water flow.
- Drilling a neat 3-inch wall opening for the piping pass-through.
- Hanging the indoor unit securely on its bracket.
- Routing the piping connections, drain line, and electrical wiring through the wall opening.
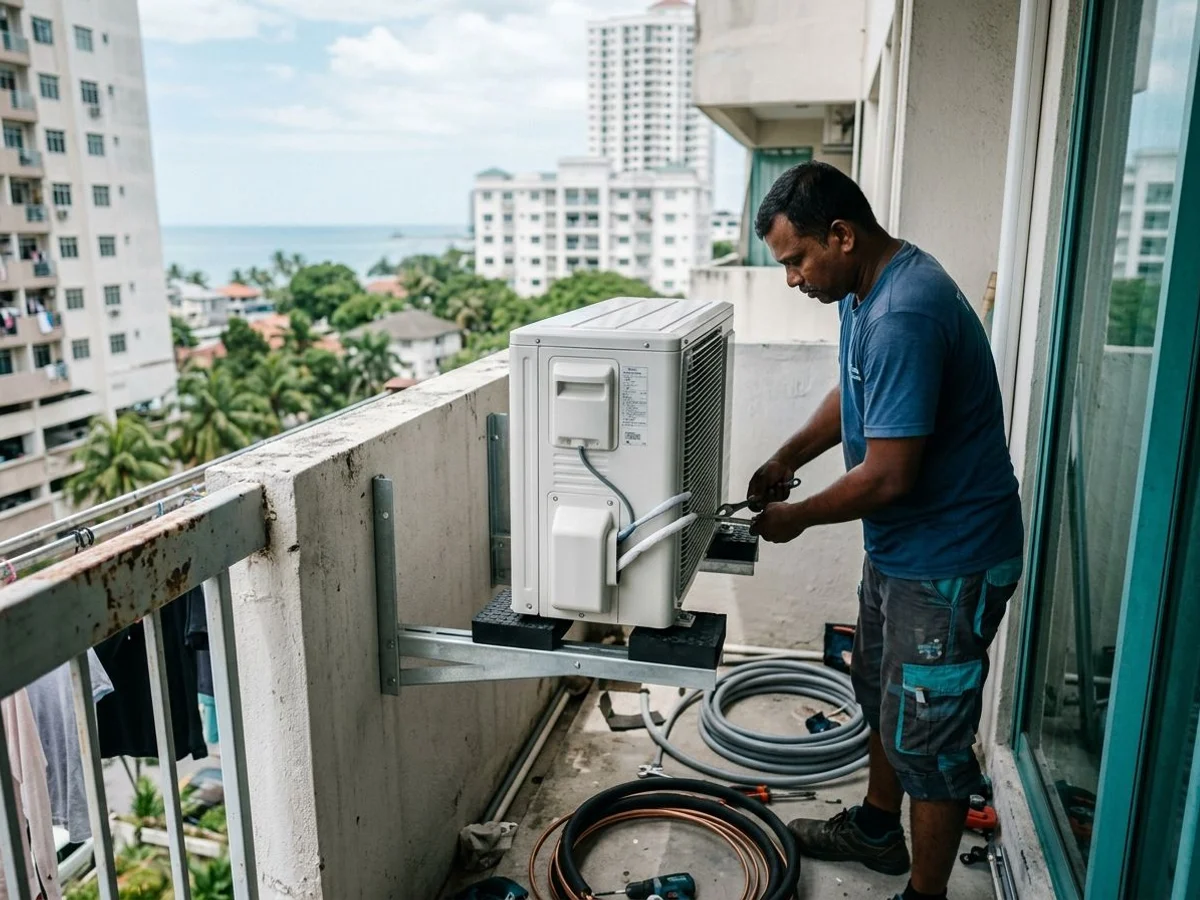
Step 4: Outdoor unit installation (45 minutes)
Your outdoor compressor handles extreme heat and vibration, so it needs a rock-solid foundation. We install rust-resistant wall brackets for condo setups or pour a concrete base for ground-level units. Many Penang management bodies actively fine owners for unsafe bracket installations. Using proper vibration pads between the unit and the mounting surface is completely non-negotiable.
These thick rubber isolators stop annoying humming noises from transferring into your building structure.
Our outdoor setup process includes:
- Fixing the wall bracket or preparing the concrete base.
- Installing heavy-duty rubber vibration pads.
- Positioning the unit with adequate ventilation clearance on all four sides.
- Completing all piping, electrical, and drain connections.
Step 5: Copper piping run (varies, 30-90 minutes)
The pipes connecting your indoor and outdoor units are the most critical part of the entire system. We see piping failures constantly during emergency repairs because installers try to save money on cheap materials. Modern systems using R32 refrigerant run at high pressures around 43 Bar. That intense pressure requires a copper pipe thickness of at least 0.71mm to prevent sudden ruptures.
Our piping standards protect your investment.
- Using properly sized soft copper pipes matched to the unit’s BTU rating.
- Wrapping the suction line in Class 1 insulation foam that is at least 3/8-inch thick.
- Creating cleanly flared joints using a specialized flaring block instead of pliers.
- Sleeving the pipes through walls without creating sharp kinks.
- Angling the drain line correctly to maintain a smooth gravity flow.
Thick insulation is essential in Malaysia’s high humidity to stop condensation from sweating inside your walls. We run these pipes inside white PVC trunking for standard jobs. Concealed pipes are channeled directly into the wall during major home renovations.
Step 6: Electrical connection (15-30 minutes)
Safe electrical wiring prevents power trips and eliminates the risk of electrical fires. We strictly follow the Energy Commission (Suruhanjaya Tenaga) guidelines for every single job. Connecting a high-power aircon to a standard 13A plug socket is a massive safety hazard. A dedicated 15A circuit is legally required for any unit sized at 1.5 HP or larger.
Our electricians handle the wiring with precision.
- Pulling a dedicated circuit specifically for the aircon.
- Mounting a weatherproof isolator switch near the outdoor unit for safe servicing.
- Connecting all indoor and outdoor wiring exactly as per the manufacturer diagram.
- Tying in the earth bond securely to prevent shocks.
Step 7: OFN pressure test (30 minutes)
Catching bad workmanship before the expensive gas goes in saves everyone time and money. Our technicians seal the pipe system and connect a tank of oxygen-free nitrogen. The system pressure is then pushed up to 30 Bar, which is roughly 435 psi. Nitrogen is used because it actively absorbs any lingering moisture inside the copper lines.
This high-pressure test holds for up to 30 minutes.
Our OFN testing checklist includes:
- Connecting the nitrogen cylinder to the sealed piping.
- Raising the pressure slowly to the required 30 Bar mark.
- Monitoring the pressure gauge for up to 30 minutes.
- Hunting down and re-flaring any leaking joints before re-testing.
A dropping gauge means a tiny leak exists somewhere in the flare joints. We only move forward when the pressure holds perfectly steady. Rushing this specific test is the number one cause of early refrigerant loss.
Step 8: Vacuum (2 hours)
Removing microscopic moisture from the system guarantees your compressor will survive its full design life. We connect a specialized two-stage vacuum pump directly to the piping system. Pumping out the ambient air drops the internal pressure down to a target of 500 microns.
Leftover air takes up space and immediately reduces the unit’s cooling capacity. Our strict vacuum protocol lasts for a minimum of two hours. Moisture trapped inside the lines eventually mixes with the refrigerant oil to form destructive acids. This acid slowly eats away at the compressor windings until the motor burns out.
The dangers of skipping a proper vacuum include:
- Reduced cooling capacity due to trapped ambient air.
- Acid formation inside the lines.
- A 50% reduction in the compressor’s overall lifespan.
A hasty 15-minute vacuum job is a massive mistake. We ensure the lines are completely bone-dry before proceeding.
Step 9: Refrigerant charge (15 minutes)
Filling the system with the exact amount of gas ensures ice-cold air on demand. We rely on the factory pre-charge for standard piping lengths up to 3 meters. Longer pipe runs require a calculated top-up of R32 or R410a gas.
Our refrigerant charging process involves:
- Verifying the total length of the copper piping run.
- Using digital scales to measure the exact weight of new gas.
- Adding the precise top-up required for runs exceeding 3 meters.
Adding too much refrigerant is just as bad as adding too little. Shorter runs usually operate perfectly on the factory charge alone.
Step 10: Commissioning and test (30 minutes)
Testing the finished system proves that everything operates at peak efficiency. We power the unit on and immediately drop the setting into maximum cooling mode. A digital thermometer measures the temperature drop across the indoor coil. A healthy system in Malaysia should show an 8 to 10 degree Celsius difference between the return air and the supply air.
Our final checks ensure total reliability.
- Measuring the actual cooling performance.
- Checking the compressor for any unusual rattling or vibration.
- Pouring water into the drain pan to verify smooth outward flow.
- Walking you through the remote control and energy-saving modes.
- Handing over the official warranty paperwork.
Step 11: Cleanup and walkthrough (15 minutes)
Leaving your home spotless is the final mark of a professional job. We pack up all empty boxes, plastic wrapping, and heavy tools. A quick wipe down removes any dust or handprints from the new indoor unit. Regular maintenance is the key to keeping your electricity bills low.
Our technicians will brief you on basic upkeep before leaving. A deep clean is generally recommended every six months to combat Penang’s dusty, humid coastal air.
- Packing up all equipment and trash.
- Wiping down the work area.
- Explaining when to schedule a chemical wash.
- Issuing the final receipt and warranty documents.
What’s typically NOT included in the aircon installation process
Reviewing our standard aircon installation inclusions helps you budget accurately for your renovation. We include up to 3 meters of high-quality copper piping in our baseline quote. Extra distance is simply charged at a transparent per-meter rate. This limit covers about 80% of standard bedroom setups in local apartments.
Our standard service excludes a few specific renovation tasks.
- Pipe runs longer than 3 meters.
- Concealed piping. Channelling pipes inside walls requires a separate scope of work.
- Hacking and patching. Your main renovator usually handles wall repairs.
- Electrical upgrades. Pulling a new main line from your distribution board costs extra.
- Condo renovation deposits. You must pay this directly to your Joint Management Body.
- The unit itself. We install the hardware you provide unless you purchase directly from us.
You can view full pricing details on our installation service page.
Booking
Getting your installation scheduled is a fast and straightforward process. We ask that you WhatsApp us with your room size, preferred install location, and a few quick photos. Seeing the space helps us anticipate any tricky wiring or bracket needs before we arrive. Most building managers require three to five days to approve a contractor work permit.
Our team will schedule your site survey within a few days of your message. Most final installations take place within one to two weeks after you approve the quote. Contact us today to lock in your preferred date and start your professional aircon installation process.